We now come to the crux of the matter, the
actual cleaning up of the sound. The most obvious defect of vinyl playback is
the frequent loud clicks where the needle had to cross a scratch on the
surface. Since the scratch may have extended a few millimetres across the
grooves, you can expect the click (sometimes it’s loud enough to be called a
thump!) to repeat at regular intervals across a length of the recording. This
is probably the first thing people would like to attend to.
You open the first segment of the file
(remember we have divided the recording into 2-minute segments) in Audacity and
take a look at it. To display different
proportions of the file, we use (click on) the ‘buttons’ on the top right
corner with the magnifying glass icon. The one with the arrow head marks toward
the middle ―<>― (where the pointer is positioned in the adjoining
picture) will display a selected portion on the screen, while the icon to its
right (with the arrow heads at the ends
>――< ) will display the entire file in a compressed form on the
screen.
By clicking on the fast rewind symbol on
the top left, you can display the start of the recording; then by clicking on
the magnifier+ symbol on top right corner, you can stretch or expand the displayed sound form so that you can see more
details of the waveform. Another way of doing this is by selecting a small
portion (by click-and-drag, or shift-click as per common usage), and then click
on the magnifier icon as shown in the following pic.

The expanded display of this fraction of a second shows the
sudden peak and trough in the sound wave that actually shows up as a loud click
(the peak and trough indicate the amplitude, or volume of the sound; it
registers as a click or thump because it stands out against the neighbouring
sounds).

Our job now is simply to reduce the peak
and trough and bring the sound wave back to the ruling amplitude in the
immediate neighbourhood.
There are many alternate ways of doing
this. In previous versions of Audacity, there was no specific menu option to
‘remove clicks’, but I just discovered that there is such an option in the
latest version under ‘Effects’.
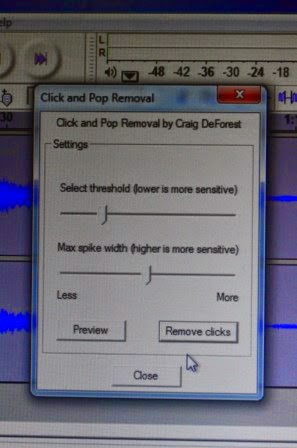
You can fiddle with the levels of
correction (using the sliders) to choose the threshold levels and the width. If
the threshold is lowered, even small clicks will be smothered; too much of this
may interfere with the actual sound recording (think of sharp percussion or
metallic sounds!). The width also can be chosen; there is also a preview option
(the lower slider). This is obviously the most painless way of doing it, and
will result in a file with all these spikes ironed out. The sound is still
there, but is not audible because it's only as loud as the preceding and
following sounds. One could also exercise an option in how much of the
recording is to be selected for doing the operation; if you select a small
portion, then you could try different levels of sensitivity, preview after each
change in levels, and finally settle for the best combination. If you’re not
satisfied by the first run, you could repeat it on all or just a portion till
you are satisfied.
The second, and laborious, way is to do it
by yourself for each spike, manually. This may become necessary if the spike
occurred in a relatively quiet portion (Beethoven is notorious for such
low-amplitude stretches!), or if you have an older version of Audacity without Craig
DeForest’s ‘click and pop removal’ (although it’s so easy to download the
latest that there is really no need to soldier on without it!). There’s also a
third option, using another program called Groove Mechanic by Coyote Electronics.
I’ll show this next post!
No comments:
Post a Comment