Saturday, April 25, 2015

09 Removing clicks using Groove Mechanic in LP recording

Here I’ll describe how to use a package like Groove Mechanic to remove clicks and other defects in the sound track. I think I started using this package after trying out a few on the web, because Audacity did not have its own facility; I found it quite efficient and easy to use, so I am including it here even though Audacity has its own option now and there is really no necessity for a separate program. Groove Mechanic (GM in the following text) is downloadable from the Coyote Electronics website www.coyotes.bc.ca/GrooveMechanic.html.

Using the software is simple; as before, I would recommend splitting a long track into manageable chunks as described earlier (I prefer 2-minute bits, using Audacity and the Snap-To feature as explained before; a 20-minute LP side, therefore, will have some 10-12 such chunks, which you can name serially). You load the first chunk into GM with the File-Open command (of course, assuming you have already installed the package and started the program, which is quite straight-forward). You will see the sound track as the familiar amplitude (volume of sound) wave-form, which is termed the Audio Timeline:

DSC_0634-web.jpg

The clicks are clearly seen as individual tall peaks, which indicate a sudden loud sound. The menu at the top has the button Repair; clicking on this gives a drop down menu whose first option is Analyze Clicks and Rumble:

DSC_0636-web.jpg

Clicking on this option starts the program’s analysis of clicks, which are marked by red lines. In the first round, there are so many of them that the whole track looks like a disaster, but don’t be put off:

DSC_0637-web.jpg

The legend at the bottom of the screen tells us that 6698 clicks have been identified and marked in red. Now we need to choose the command Fix Clicks and Thumps under the menu option Repair (as before). The program reduces the amplitude of the clicks (just like we did manually with the pen tool in Audacity a while back), and presents us with the cleaned up version:

DSC_0638-web.jpg

This still has some tall peaks indicating that there is still scope for cleaning it; but before working on it further, it is necessary to save this version of the track (I prefer to save it under a different name, e.g. adding a tag like –fixed or –click to the original name, using the command Save As; using the option Save gives you a chance of overwriting the existing original file or cancelling the command). Now you can close the original file and load the modified file (using File- Open). You can listen to the cleaned up sound ttrack, to see if it still sounds too scratchy or crackly for comfort, which may induce another round of cleaning. Running the Repair-Analyze Clicks command again gives us this diagnostic picture, showing as many as 2183 clicks in the second round:

DSC_0639-web.jpg
Saving this version (I usually overwrite the –fixed.wav file at this juncture) and again loading it and running the Analyze command gives another 855 clicks marked out in red at this stage 3:

DSC_0640-web.jpg
I usually repeat this cycle until the clicks in a 2-minute segment are below 500; this also demonstrates why it is advantageous to break up the track into smaller chunks (not every portion will require the same level of cleaning up; the initial segments may call for 3 or more rounds, but usually the later portions may not need much):

DSC_0642-web.jpg
Finally, the cleaned up segments need to be put together in correct sequence (I use Audacity for this), and the whole track then saved under a suitable file name with the tag –fixed or –click, and any unnecessary intermediate files deleted (making sure to keep the original file, however).

Wednesday, March 4, 2015

08 Removing clicks in the recording manually

Scratches in the quiet parts of the LP grooves are often difficult to eliminate, because they stand out so in contrast with their immediate neighbourhood. You may like to deal with the worst of them manually, if they still remain after a few passes with the automatic click removal routine (see previous post). Such large clicks or thumps are more frequent in the initial parts of the recording, from the outer portions of the vinyl platter.

Audacity provides ways of dealing with such persistent and awkward defects. The most laborious way is to zoom in on the portion with the magnify tool (the magnifying glass + icon, or you could select a small portion and maximize it with the right-most magnifier tool) until you are able to see the individual data elements as discrete (separate) dots on the wave-form, as we can see in this sequence of screen shots.

Having zoomed in till you can see the individual dots (the sampled points), you then choose the ‘pencil’ icon from the top-left panel. With this tool, you can click and drag it across the screen to draw a new wave shape, to smooth out the sudden spike. Initially, to get the feel of it, you can click on (or just above or below) each dot separately to reposition it. 

As you get comfortable with this procedure, you can graduate to a free-flow redrawing of the wave envelope. You needn’t despair if some of the time you go outside the line you’ve set for the new wave, since you can always correct it as many times as you want. I like to give a slight up-and-down shape to the sequence of dots, so that it doesn’t result in a sudden silent patch (a hiatus) in the sound stream. The maxima (peaks and troughs) have just to be within the broad limits of the neighbourhood to mask the spike (since there won’t be any musical sound there). The result looks like the following.

If you compress the wave display back, it looks like the normal up-and-down wave form without the peak that touched close to the top or bottom of the channel display (db or decibel level +1.0 or -1.0 in the display). 


If the thump is very broad and extreme, it may not be not be easy to do this as it occupies a wide patch. You could even just select the offending portion (a fraction of  second in practice) if it would not compromise the recording completely. Another option is to use the Effect-Compress operation, on a selected portion containing the broad thump. You should experiment with different settings in this, and you can Preview the effect before making it final.

Just remember to Save the edited recording frequently (use Save As and give new names, tagging on something like –ed or –new to differentiate the corrected bits)! This is one reason I like to slice the raw recoding into small chunks (I like to use 2-minute bits) – in case you goof, it won’t be that difficult to retrieve thee situation. And keep the raw recordings (the entire recording as well as the unedited segments) until you have done the cleaning up on all the segments and put them all together to your satisfaction: you never know what mistakes will have crept in (like missing out a segment, wrong sequencing, and so on).


I'll describe Groove Mechanic next post!

07 Removing clicks and pops in the recording

We now come to the crux of the matter, the actual cleaning up of the sound. The most obvious defect of vinyl playback is the frequent loud clicks where the needle had to cross a scratch on the surface. Since the scratch may have extended a few millimetres across the grooves, you can expect the click (sometimes it’s loud enough to be called a thump!) to repeat at regular intervals across a length of the recording. This is probably the first thing people would like to attend to.

You open the first segment of the file (remember we have divided the recording into 2-minute segments) in Audacity and take a look at it.  To display different proportions of the file, we use (click on) the ‘buttons’ on the top right corner with the magnifying glass icon. The one with the arrow head marks toward the middle ―<>― (where the pointer is positioned in the adjoining picture) will display a selected portion on the screen, while the icon to its right (with the arrow heads at the ends  >――< ) will display the entire file in a compressed form on the screen.

By clicking on the fast rewind symbol on the top left, you can display the start of the recording; then by clicking on the magnifier+ symbol on top right corner, you can stretch or expand the  displayed sound form so that you can see more details of the waveform. Another way of doing this is by selecting a small portion (by click-and-drag, or shift-click as per common usage), and then click on the magnifier icon as shown in the following pic.
 The expanded  display of this fraction of a second shows the sudden peak and trough in the sound wave that actually shows up as a loud click (the peak and trough indicate the amplitude, or volume of the sound; it registers as a click or thump because it stands out against the neighbouring sounds).

 Our job now is simply to reduce the peak and trough and bring the sound wave back to the ruling amplitude in the immediate neighbourhood.

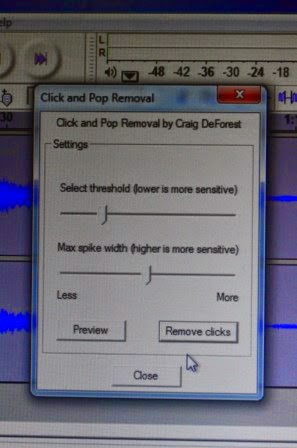
There are many alternate ways of doing this. In previous versions of Audacity, there was no specific menu option to ‘remove clicks’, but I just discovered that there is such an option in the latest version under ‘Effects’.

You can fiddle with the levels of correction (using the sliders) to choose the threshold levels and the width. If the threshold is lowered, even small clicks will be smothered; too much of this may interfere with the actual sound recording (think of sharp percussion or metallic sounds!). The width also can be chosen; there is also a preview option (the lower slider). This is obviously the most painless way of doing it, and will result in a file with all these spikes ironed out. The sound is still there, but is not audible because it's only as loud as the preceding and following sounds. One could also exercise an option in how much of the recording is to be selected for doing the operation; if you select a small portion, then you could try different levels of sensitivity, preview after each change in levels, and finally settle for the best combination. If you’re not satisfied by the first run, you could repeat it on all or just a portion till you are satisfied.


The second, and laborious, way is to do it by yourself for each spike, manually. This may become necessary if the spike occurred in a relatively quiet portion (Beethoven is notorious for such low-amplitude stretches!), or if you have an older version of Audacity without Craig DeForest’s ‘click and pop removal’ (although it’s so easy to download the latest that there is really no need to soldier on without it!). There’s also a third option, using another program called Groove Mechanic by Coyote Electronics. I’ll show this next post!

Tuesday, February 10, 2015

06 Slice the raw recording into segments

First, have a look at the file

When you are ready to start processing the recording, I would suggest first having a look at its general condition. Of course, you would have got a pretty good idea of the quality during the process of recording, especially if you had taken the trouble of jotting down notes on the time points at which problems occurred: maybe a long initial empty stretch before the needle hit the groove, or a stuck groove, or some breaks which you re-recorded in another file, or certain very noisy portions. Here’s a suggested work flow to deal with it all.

Next, trim the empty bits

First things first: you need to trim off the leading empty stretch (the leader), taking care to leave a few seconds before the actual recording starts, so that you have a good stretch to capture background ‘noise’ if needed (like the ‘hiss’ in a tape). Believe me, if you’re doing a Beethoven, you will need it, as he is particularly challenging to record with alternating stretches of very loud and very soft sound. If the scratching noise in the quiet stretches is too obvious, you may have to try subtracting the noise at least in these quiet stretches (the background noise will usually not be noticeable in the loud bits).


To trim the leader in Audacity, you first load the .wav file you have previously saved (menu File/Open), and move your cursor position to the start (click on fast rewind, the double left arrow << in the control bar, just like any audio player).
Then position your cursor at the end of the stretch you wish to delete, hold down Shift and click. The stretch between the start and the current cursor position will go dark grey, in token of being Selected; then you click on the Cut button (scissors icon, but Ctrl-x and Del key also work) to delete that portion. There is another way to Select a stretch, in the Edit/Select menu: you can Select a stretch from Start to Cursor, or from Cursor to End, and do your stuff. The latter option is useful if you need to trim off any ending empty stretch in a similar fashion. Of course, you have to first position your cursor at the point in the recording that you want to work from (or to).


If the rest of the recording is good, that’s all you need to do, and  you can save the whole file using File/Export as a .wav file, giving it a suitable name that gives the composer, genre etc. (the original file can have the tag –raw.wav, the modified can have the tag –fixed.wav, as suggested in a previous post).

Break the file into (2-minute) bits using Snap-To

If, as is more likely, you would like to improve the recording, one of the most helpful things you could do would be to break up the file into little bits; I like two-minute sections. There are many advantages in doing this, and dealing with each section separately. One is that loading, processing, saving the files become much faster, so that you can achieve some progress even in a short sitting. Secondly, if you goof up somehow (deleting the file, for instance), or the computer hangs, you will only loose the current two-minute bit, rather than the entire work. In fact, if you load and try to work on a long file, chances are that the system will hang or crash; so dividing it into small bits is helpful even if you have all the time (and patience!) in the world.

There is a very nifty feature in Audacity called Snap-To (on the Edit menu), that is enormously helpful in doing the `slicing’ precisely. By turning Snap-To On, the cursor goes precisely to a full number on the time line (minutes or seconds, depending on how zoomed in you are). You may have to experiment a bit with zoom levels to ensure Snap-To to goes to a full number of minutes, such as 2:00, 4:00, and so on. First, load the whole file (with trimmed beginning and end, as described above), turn on Snap-To, position the cursor near 2:00 (miniutes), which should pull it exactly to 2:00, then on the Edit menu choose Select /Start to cursor, then File/Export Selection to save this portion as a separate file. Next, Select from 2:00 to 4:00, go through this cycle repeatedly till the whole file is done. You will name the files name-01.wav, name-02.wav, etc.

Now you can load each section separately and do whatever processing you need, and Save the corrected files as name-01-fixed.wav, etc. To put them all back together, you will have to File/Open the first one, move the cursor to the end (click on the button for Fast Forward >> as usual), then Open the second file in a second window (use File/Open), then select the whole of this second section by Edit/Select All, then Copy the selection (the usual Ctrl-c works!), switch back to the first file, Paste (Ctrl-v works), then move the cursor to the end of the appended bit (Fast Forward >> again!), add in the third file, and so on repeatedly. The only thing to look out for is not to miss any file in the sequence, and to do it carefully and systematically. Finally save the whole thing with a name-fixed.wav filename. Of course, it will be advisable to save the interim file after each step!


What processing to do on each bit (click removal, noise removal, etc.) will be discussed in the next post.

Monday, February 2, 2015

05 Capturing the sound output

Now that you’re all hooked up (see previous post), it is time to start capturing the sound from the grooves. Switch on the computer, start up Audacity, hover your mouse pointer next to the red REC circle in readiness to start the recording. Turn on the turntable with the LP on it, check the cables, and then in sequence, start the recording on Audacity and drop the needle onto the groove (gently, gently!).

If all is well, the sound should be heard on your music system (if you’re using one as receiver), and the computer (you can turn down one of them). The incoming sound will be depicted as a wave profile in the Audacity screen (two channels for stereo, only one if it’s recording in mono). The wave profile shows the amplitude of the sound wave (loudness), and you can see that it reflects the up-and-down oscillation of the signal, which is translated into the back-and-forth oscillation of the surface causing the sound (your speaker diaphragms, your ear drum membranes and tiny bones).

You will also see sudden spikes mirroring the abrupt clicks or bigger ‘thumps’ which are normal with records. These are the scratches, clicks and thumps (hiss, crackle and pop!) that you will be reducing or eliminating using the software. These are usually seen mostly on the outer centimetre or so of the record (that is, at the start of the playback), probably because most of the handling is done at these edges, the needle has been dropped on the outer edge more times than the middle (maybe even pushed by jerky movements), and possibly more dust has collected on the outer edge even as the LP lay dormant inside its jacket. Of course, if the LP has been maltreated, kept horizontally and badgered around, or (shudder!) kept naked without its inner polythene and paper slip cover, or outer jacket, it will probably show visible scratches on its surface.

If the sound is very bad even after the outer centimetre or inch, it may be worthwhile to stop the recording and take the plate off the turntable and closely examine the surface. Perhaps there is some goo or gunk adhering to it in places, which may even cause skipping of grooves or the dreaded endless loop on the same groove (like a stuck record!). A little cleaning may be called for. As an old hand at this game, you probably have your own favoured methods of cleaning, starting with blowing or vacuuming (but beware of adding new dust and grit as you are taking the old off!), wiping with a wet cloth, and even using cleaning liquids (isopropyl alcohol; or your favourite drink if nothing else is around). I gather that alcohol is not good for old records made of bakelite or shellac, but is ok for later plates made of synthetic material (vinyl) (apply liquid to cloth and cloth to LP, test on  a corner or in the centre to make sure it doesn’t dissolve the material!). For a particularly greasy old LP, I have even used detergent and held it under a stream of water from the washbasin! I won’t divulge the other stuff I’ve tried to reduce the crackle for very bad surfaces, but it involved water or alcohol to dislodge gunk in the grooves and baby oil to lubricate the needle movement. I believe a drop of liquid at the needle facilitates smoother floating, which may help it to overcome small abrasions or dents. If you do try this, it should be done first on an experimental basis with a useless record, and try to apply it only at obvious problem spots. These can be located by looking at the surface at  a low angle with grazing light, which will show areas where some stuff has lodged in between the grooves or on the surface.

Now here’s a suggestion on the general strategy, the ABC (triage) of rescuing the recording. If there have only been a few glitches at the start – say, a couple of spots with large clicks, or one or two small patches with a recurrent click or scratchy reproduction – and the reproduction settles down after that, I would suggest allowing it to play on. This is because the dust settled into the grooves may get loosened and dislodged at the first playback, and you can then go in with brush and blower to root it out for the second run which may be much better (and do blow or brush from below, so that the dislodged particles float off into space rather than settling down again on the surface).

A good part of the recording may actually turn out quite fine, especially the whole of the second and subsequent tracks. Even if a part of a track is good, the second run of the recording can be restricted to the defective parts, and the concerned bits spliced together digitally in the software. So if the bulk of the recording is going on well, let it continue to the end. Then stop the recording and turntable, and save the raw file as it is, giving it a useful name such as beethoven-concerto-violin-Perlman-side01-pass01.wav or something. Organize your files by subdirectories from the beginning (you could use recordings\beethoven\concerto\violin\LPnumber for instance) to avoid going crazy later (no nonsense of “everything is miscellaneous”, see here).

You don’t have to record the whole side in one file. If you have to pause the recording for some reason, lift up the needle gently and stop the recording there and save the file as …\part01.wav or …\track01-03.wav something. Anyway you would probably like to store each track as a separate file on the computer.  Good, bad or indifferent, just save the file and carry on.

If the recording is really bad, however, like if there are too many jumps or stuck grooves or interfering sounds (sometimes the computer beeps are added to the recording!), then it may be better to abort the recording to save overall time. If the recording is very bad, it could be abandoned in its entirety, or if some tracks are good, just those could be saved. Then attend to the glitches (clean the surface, switch off cellphones, for instance) and redo the recording.

One trick to overcome repeating (stuck) grooves: by applying a slight pressure on the stylus head (put a small card on it or press down very lightly with a card), it may be persuaded to get over the defect and carry on. Don't overdo the pressure, because it may lower the speed audibly and spoil the recording. If you catch the stuck groove immediately it happens, probably the best thing to do is to simply carry on with the recording, and attend to the defective portion in software later.

If the record is really really bad, it may be best to forget about it. In any case, I would recommend looking up the album on the web, in case there is a downloadable version already (always making it clear that we are not encouraging copyright violation), and in fact that may well be the first thing you ought to be doing, unless you’re taking it up as a challenge or a learning experience. Small defects however need not upset your rhythm: there are ways to deal with these in software, including some slight cheating which should not detract from your pleasure in the recording. More on these matters later!

Saturday, January 31, 2015

04 Connecting amplifier to computer

In the previous post, we connected the turntable to the amplifier (in my case, a boombox). Now we connect the amplifier to the computer, again using the standard audio cables, but with a slight modification, as the computer input socket is a single one carrying both the channels. So the connector cable has two prongs on the boom-box audio out end like this (the left side pair, the left and right channels are colour coded by a ring of colour, this being a more sophisticated, up-to-date 24-carat gold-plated version).

On the computer end, the sockets are coded pink for line-in, green for ear-phones or speaker audio out, and mine has a blue one which was used to connect a woofer.

The connector ends of the cable are as shown below; at the boom-box end, the usual red and white RCA standard prongs (jacks); the yellow third prong is for video signal, and not used here, and mark the gold coatings!

And at the computer end, both channels are fused into one black-coloured jack with a single prong that has two segments (the yellow prong is again for video).
The black jack (my packaging calls it a 3.5mm stereo male jack, and it happens to be grey with a blue band as befits a 24k gold thing, not black!) is then pushed into the pink socket on the computer as shown here (the green jack next to it is for the computer’s speakers).
Now the computer can receive the audio stereo input, and if you have also opened the Audacity package and started recording, you will see the sound-waves depicted in the following classical fashion (which is why the audio files have a .wav extension!).
You can have a closer look at this screen, which will be explained in the next post, but meanwhile here’s a picture of the whole set-up. One feature about my experience in getting this set up was the realisation that my laptop’s line-in (mic in) socket doesn’t seem to be working, so I have been forced to use the desk-top. The boombox also works with tapes, which is a relief, as a bigger music system I used earlier was resulting in a lot of clipping of the sound waves (apparently some hardware problem, in either the music system or the laptop). Another point is that an older turntable (a Garrard) apparently gives such a weak output that it’s unusable. Perhaps the current turntable has a certain amount of pre-amplification built in; I am not very sure.

Here’s the whole set-up.  And yes, the Violin Concerto is absolutely the first to get the treatment!

03 Connecting turntable to amplifier

Turntables can come with their own built-in amplifiers, or without. The amplifier is required because at the time of recording, when the grooves are cut, the lower notes are reduced in amplitude to reduce the width of the grooves, according to a standard equalizer algorithm, and this has to be reversed at the time of playback (I’m not an engineer, so you will have to read about it elsewhere (http://en.wikipedia.org/wiki/Gramophone_record is as good a place to start as any!). History of equalization is here http://en.wikipedia.org/w/index.php?title=Gramophone_record&action=edit&section=32),

My turntable comes with speeds of 33, 45 and 78 rpm (revolutions per minute), which suits a wide range of gramophone discs (records), the favourite being of course the 33 (or more precisely, 331/3) LP (long-playing) discs, or vinyls (after the material used). The turntable has to be hooked up to the amplifier, which in my setup is a portable boom-box (which can be termed the receiver, as it receives the output from the turntable). Both the turntable and the receiver (the boombox) have the sockets required to insert the ends of the standard audio cables required. Many systems may not have these, or may use other types of sockets, which may call for adapters to connect the standard cables, so you may have to do a little mix-n-match to get it all set up! The sockets on the back of the receiver are colour-coded red and white to distinguish the right and left channels of the stereo output. 

The receiver has two pairs, for audio input (on the right) and output (on the left); more sophisticated integrated all-in-one systems may have further options for a MIDI device, video output, mp3, and so on.


The back of my turntable has only two sockets, and not colour-coded, for audio out.

Operation of your turntable must be familiar to you (you’re an audiophile, after all!), so all that’s left is to connect the two audio cables, for each of the stereo channels, from the back of the turntable to the ‘audio in’ sockets at the back of the receiver (amplifier or audio system). The cables, available at any electronics store, are called a ‘portable audio cable’ on my package, and the end of each is provided with a standard ‘RCA Male’ prong (red and white coded, and stuck together to stop you from going mad with all the tangling).

The other ends go into the receiver (the right-side pair back of my boombox, red and white).

The boombox (or music system or whatever you are using) has to have its ‘function’ or similar selector switched to audio input, usually labelled ‘AUX’ (for ‘auxiliary’, i.e. additional, attached, unit), or ‘PHONO’ (for gramophone), or something similar. Now if you play the turntable (obviously putting an LP on it, setting the appropriate speed, and turning it on and dropping the needle on to it the usual way), you should be able to hear it on the receiver.

Next is to connect the receiver to the line-in socket of your computer, the subject of the next post.